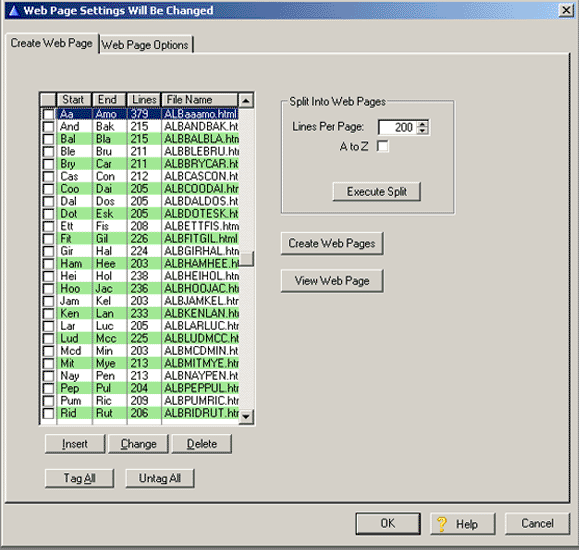
The default will be lines per page unless the A to Z box is checked. After making your choice, select the Execute Split button and the program will automatically split up your data into multiple pages as selected. When splinting the data into a fixed number of lines per page, the program will create a break closest to the desired number of lines per page depending on the last names.
The list box shows the Start and End letters for each page, the number of lines per page and the name of the web page that will be generated.
Next, you need to define your web page options by selecting the Web Page Options tab as shown:
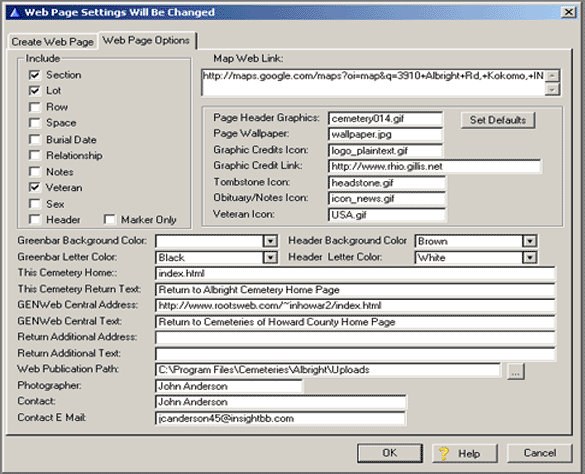
The options are:
Include
You can select what information will be contained on the web page by checking the desired check boxes. The web page will always contain the Last Name, First Name, DOB and DOD. The Header option will add to each page, the City, State, County, Township and link to your web map ( Mapquest or any other map provider ) as defined on the Cemetery update screen. If you want to include those records marked as Marker Only you must check the Marker Only box.
Greenbar Background Color
To create alternating color lines on each page ( called greenbar ), you can select the background color from the drop list.
Greenbar Letter Color
The color of the text on each line is defined by the Greenbar Letter Color drop list.
Header Background Color
The column header background color may be selected from the drop list.
Header Letter Color
The text in the header may be selected from the drop list.
This Cemetery Home
Enter the cemetery home web page file name ( typically index.html ). This information will be used to create a link at the bottom of each web page.
This Cemetery Return Text
Enter the text you want associated with the above link.
GENWeb Central Address
If you have a central web page from which all other cemeteries are linked from, enter the web .html name of this page.
GENWeb Central Text
Enter the text to be displayed for the link above.
Return Additional Address
If you want to define a link to a 3rd page, enter the name of the .html page
Return Additional Text
Enter the text to be displayed for the above link.
Web Publication Path
Enter where you want your created web pages to be placed during creation. I like to create a subdirectory where all of my web pages are located, waiting for uploading to the web server. This is also the directory where your obituaries will be stored after printing.
Photographer
To credit the individual who took the tombstone photos, enter their name. This name will appear at the bottom of each web page, with a disclaimer saying all photographs are copyrighted by�. Etc.
Contact
Enter the persons name who is responsible for maintaining the information on the web site. This name will be displayed at the bottom of each web page with a link to the email address ( below ).
Contact E mail
Enter the email address of the contact to be displayed at the bottom of each web page.
Map Web Link
You can create a link that will show a map of the cemeteries location. You may use the maps on Google, MapQuest or Yahoo. A link to this map, if selected for publication, will appear at the top of each web page. I often copy and paste this link to my main cemetery page rather than on each web page. The Cemetery Address entered on the Cemetery update page will be the text displayed for this link.
Page Header Graphics
At the top of each web page is a graphic image of a cemetery. Enter the name of the image you wish to use. See Set Defaults below.
Page Wallpaper
If you want to have each web page have a certain wallpaper, enter the name here. See Set Defaults below.
Graphics Credits Icon
If you're using a page header graphic that needs credit to the creator, and that individual has a graphic icon, enter it here. See Set Defaults below.
Graphics Credits Link
To create a link to the above graphic creator web site, enter it here. See Set Defaults below.
Tombstone Icon
You may choose what icon will be displayed on the web page for the tombstone photo link.
Obituary/Notes Icon
You may choose what icon will be displayed on the web page for the obituary/Notes link.
Veteran Icon
You may choose what icon will be displayed on the web page for the veteran.
Set Defaults
To set the following default graphics described about:
Page Header graphics: cemetery014.gif
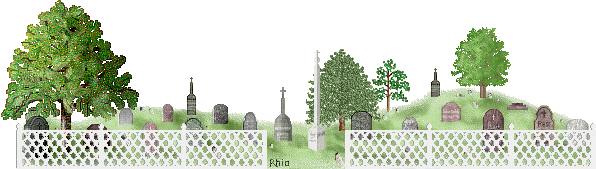
This graphic requires that credit be given to Rhio's Sampler
Page Wallpaper: wallpaper.jpg
Graphic Credit Icon:
Graphics Credits Link: http://www.rhio.gillis.net
Tombstone Icon: Headstone.gif -
Obituary/Notes Icon: icon_news.gif -
Veteran Icon: USA.gif
To set these default values, click on the Set Defaults button.
You are now ready to create your web pages. .
To create a web page, click in the leftmost column of the list box to mark the selected page for creation. Next, click on the Create Web Pages button to create a web page for each page that had been checked. To view the created web page, highlight the page name and click on the View Web Page button. The web pages are stored in the directory you defined on the Web Page Options tab. Here is a sample web page:
South Union Cemetery